Have you ever had to dig and pour sono-tubes or porch piers? if so you already know how important it is to have a solid foundation for your deck or out building. Here in northern Vermont we have soil types varying from solid granite all the way through sand and clay. Each of these conditions requires a different solution to secure your project to the ground. Here is one of our favorites and, some of the pros and cons.
Precast piers have the advantage of being quick to install, and you can build on them the same day you plant them in the ground. Additionally they generally cost less in labor and materials to install than a standard sono-tube and big foot base. The disadvantage is they require a bit more skill to install. This is because you have to set them at the right height the first time. And this requires that you not over-dig the hole. Why? Because the materials that you dig out is naturally more stable than a recompacted material(by material we are talking about the dirt and stone in the ground). If you were to install a precast pier on un-compacted soil, on a unlevel base, or on a base with voids, it is likely that you will have some sort of failure. These failures can show up as tipped, sunk, or raised piers. And a foundation that is not stable is a great way to ruin the structure above it. How do you combat this inherent problem with precast piers, or we should say the problems with installing precast piers?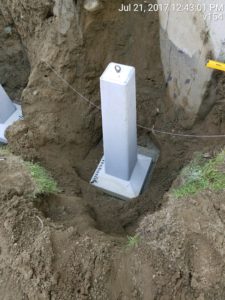
First : DONT OVER-DIG . Over digging is when you dig the hole slightly or greatly bigger than necessary. This is easy to do excavators dig quickly and it can be fun to just keep on going. Also over-digging makes it easy to have a perfectly level base at the bottom because you can refill to the right height. And level just the way you want it. however as we already discussed compacted material is not as stable as original material. In addition a mistake many contractors make is to fail to compact, just shoveling in and hand raking materials to get a level surface.
Second: Start with a level base below the pier. This will require some hand digging and care spent in the dirt with a level. Its not any fun, its up-close and personal, and the temptation is to say”why do it by hand the excavator is right there?” because neatness counts. Hand work here pays off. How? It keeps you from having any voids form under the base of the pier. Voids that can allow tipping sinking , and other possible failures in the future.
We have ,with the help of an engineer, come up with an innovative solution to this problem. What we do is build a 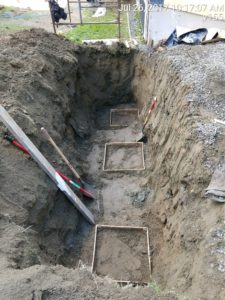 small concrete from that is larger than the base of the pier at the bottom of the hole. We accomplish this by over-digging(yes over-digging!) about 4 inches then build a concrete form. And leveling it perfectly. The form only needs to be about 4 inches thick. In the picture to the right you can see the forms on the bottom of the hole where we place 3 piers. We then mix about half a bag of premixed concrete and fill the form and screed it off with a block of wood. let the concrete set for about 3o minutes , at this point the concrete has filled every possible void at the bottom of the form and is a perfectly level surface for the pier to set on. Why only 30 minutes? Because the pier is concrete and we want to have enough “squish” left in the poured concrete to get full contact, with the pier while supporting the pier in a perfectly level position. Below you can see the piers on the concrete pad.
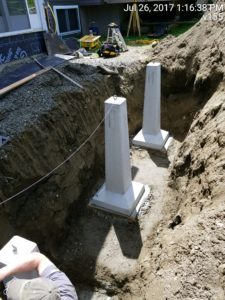
Now Your ready to backfill.
Third : Compact the soil back in around the pier as you backfill. This helps greatly to keep your pier firmly situated and keeps your soil from compacting so much over the next season. Leaving an unsightly and water collecting depression around your new pier.
Properly installed pre-cast piers can save you money time and make your project last a lifetime!